What the video found — and what this pack is showing
Out of Spec Renew opened a 2015 first-gen 85 pack with a voltage-sense alert. This page maps each failure they show to this car’s Scan My Tesla snapshot so you can inspect in the right order, in plain language.
Temps were even (16.5–17.6 °C). This is a voltage / sense problem, not a hot module.
The video
Out of Spec Renew — Tesla Model S Battery Failures: Most Common Problems (2015 P85D 85 pack, VSSH alert).
Video point → this pack
Same generation pack. Same failure modes. Their examples were M8 (loose sense wire) and M9 (corroded C26/C27). Ours lights up those plus a cluster of “low 5 / high 6” modules.
1. Water gets in through valves and a rusty fuse cover
Video · 2:57 and 14:00
Umbrella valves on the sides clog with dirt and stay open. Front of the pack gets tire spray. Early AC drains dumped water on the lid. Steel pyro / thermal-fuse covers rust through — especially in salted-road states like Michigan. Water then sits on boards and sense joints.
This pack
Michigan car. First look with the lid still on: valves packed or crushed? rust-through on the fuse cover? white powder or water stains on the lid or bus bars? Isolation (pack-to-chassis) is the number that tells you if water already reached live parts. Pulling the pack fuse only cuts the car — modules stay live.
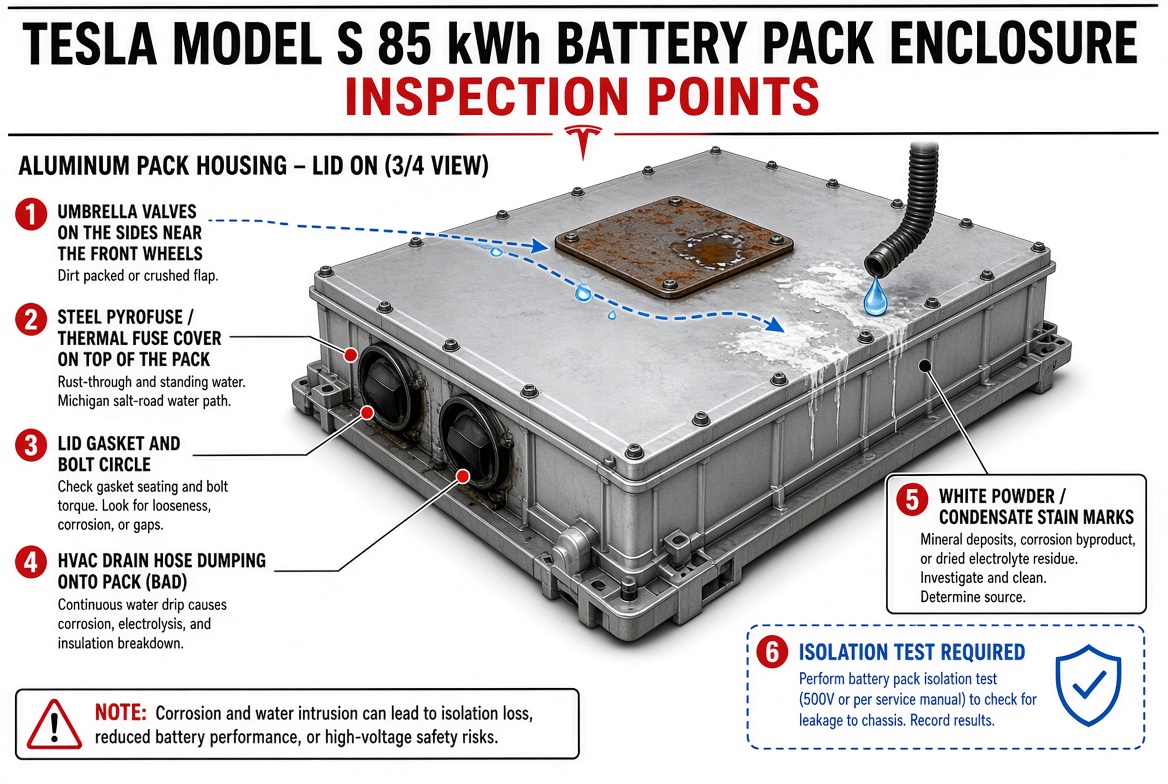
Look at these six spots before you pull a single module.
2. A sense wire pops off the collector plate
Video · their fail was Module 8
Tiny wires measure each brick. One loose wire can make two neighboring bricks look crazy. Codes: F107 (bad voltage reading) or F177 (open voltage-sense harness). Fix is reseat / extend the lead onto the plate and tug-test it.
This pack
M8 is not the worst on SMT, but it is the video’s example and it sits in the stacked front pair — open it first. M8 B3 is a bit low (3.726) and B4 a bit high (3.800). That “one low, neighbor high” pair is the classic loose-lead look. Tug every lead, especially orange (B3), green (B5), blue (B6).
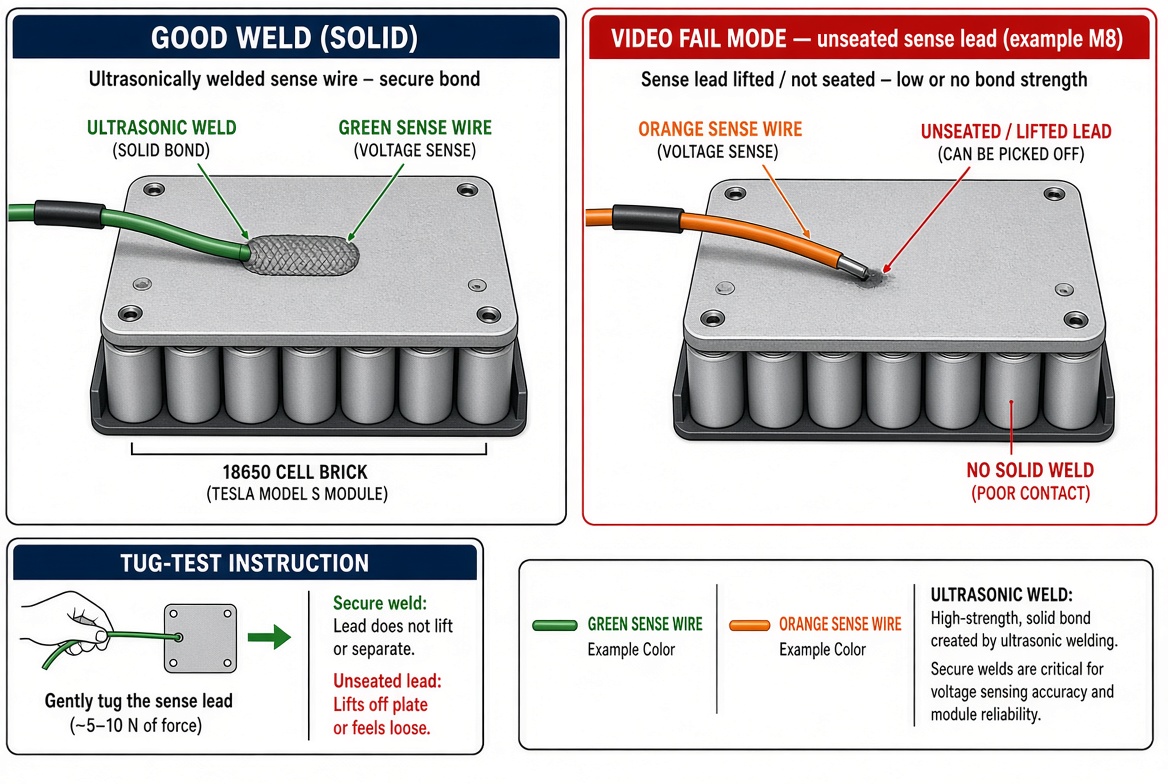
Good weld stays put. Unseated lead lifts with a light tug.
3. Two little capacitors on the BMB go bad (C26 and C27)
Video · 10:56 · their fail was Module 9
A perforated plastic flap rubs the coating off C26 and C27. Moisture then eats the caps. That board lies about brick 5 and brick 6 — usually one reads high and the other reads low by about the same amount. Code W173 is “brick 6 sense problem.” Tear the flap off so it cannot rub.
This pack — this is the loudest pattern
Five modules show the exact “low 5 / high 6” pair the video describes:
- M6 B5 3.671 · B6 3.857
- M9 B5 3.673 · B6 3.862 (video’s example module)
- M10 B5 3.685 · B6 3.844
- M11 B5 3.679 · B6 3.849
- M16 B5 3.691 · B6 3.842
Treat those as sense / BMB until a meter on the collector plate says otherwise.
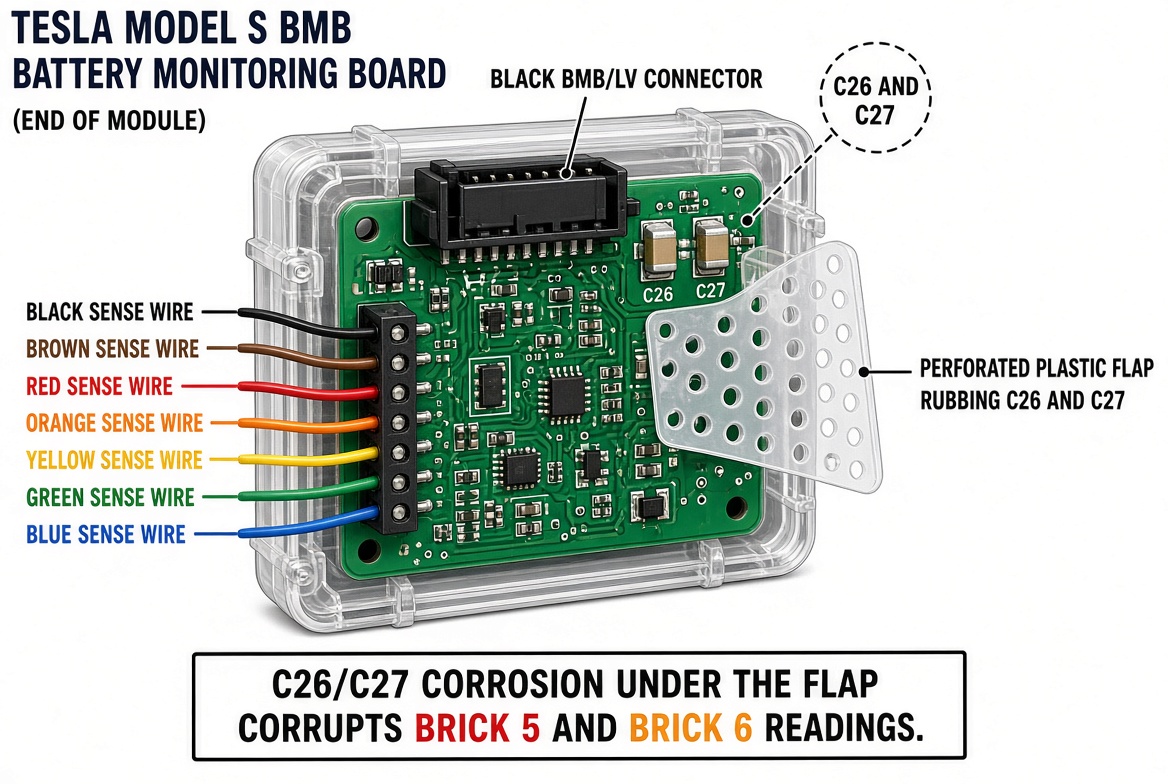
C26 / C27 live under the flap. They are what corrupts B5 and B6 on the screen.
4. A real weak brick (not just a lying board)
Video · 21:00
Some cells grow a weak internal short. They self-discharge. The pack then shows a true voltage gap. BMS can only bleed the high bricks slowly through small resistors, so a big gap does not fix itself on short trips. U018 = large SOC imbalance. U029 often rides along with a weak short.
This pack
M7 holds both the pack minimum and the pack maximum: B3 = 3.622 V and B6 = 3.965 V. B4 is also soft at 3.698 V. That is not the tidy equal-and-opposite B5/B6 lie. If a meter on the plate matches SMT here, M7 has a real brick problem — not just a bad board. Capacity is still tight (208–211 Ah), so this is voltage drift, not a dead module yet.
5. How they tell “lying board” from “real cell”
Video · 39:41
Scan My Tesla is the live map. A handheld meter on the collector plates is the truth. High resistance on a sense point = bad connection. Impossible numbers (one brick 0 V, neighbor 5 V) = sense or BMB, not a cell.
This pack — the two calls
- Meter matches SMT on M7 B3 3.622 and B6 3.965 → real brick issue.
- Meter is normal on a “crazy” B5/B6 module → board or wire. Reseat, replace BMB, peel the flap.
- After a reseat, F107 / F177 / W173 / VSSH often go quiet.
Where each module sits
Use BMS / Scan My Tesla numbers, not the high-voltage busbar zigzag. The zigzag will send you to the wrong module. Confirm the number printed on the BMB plug.
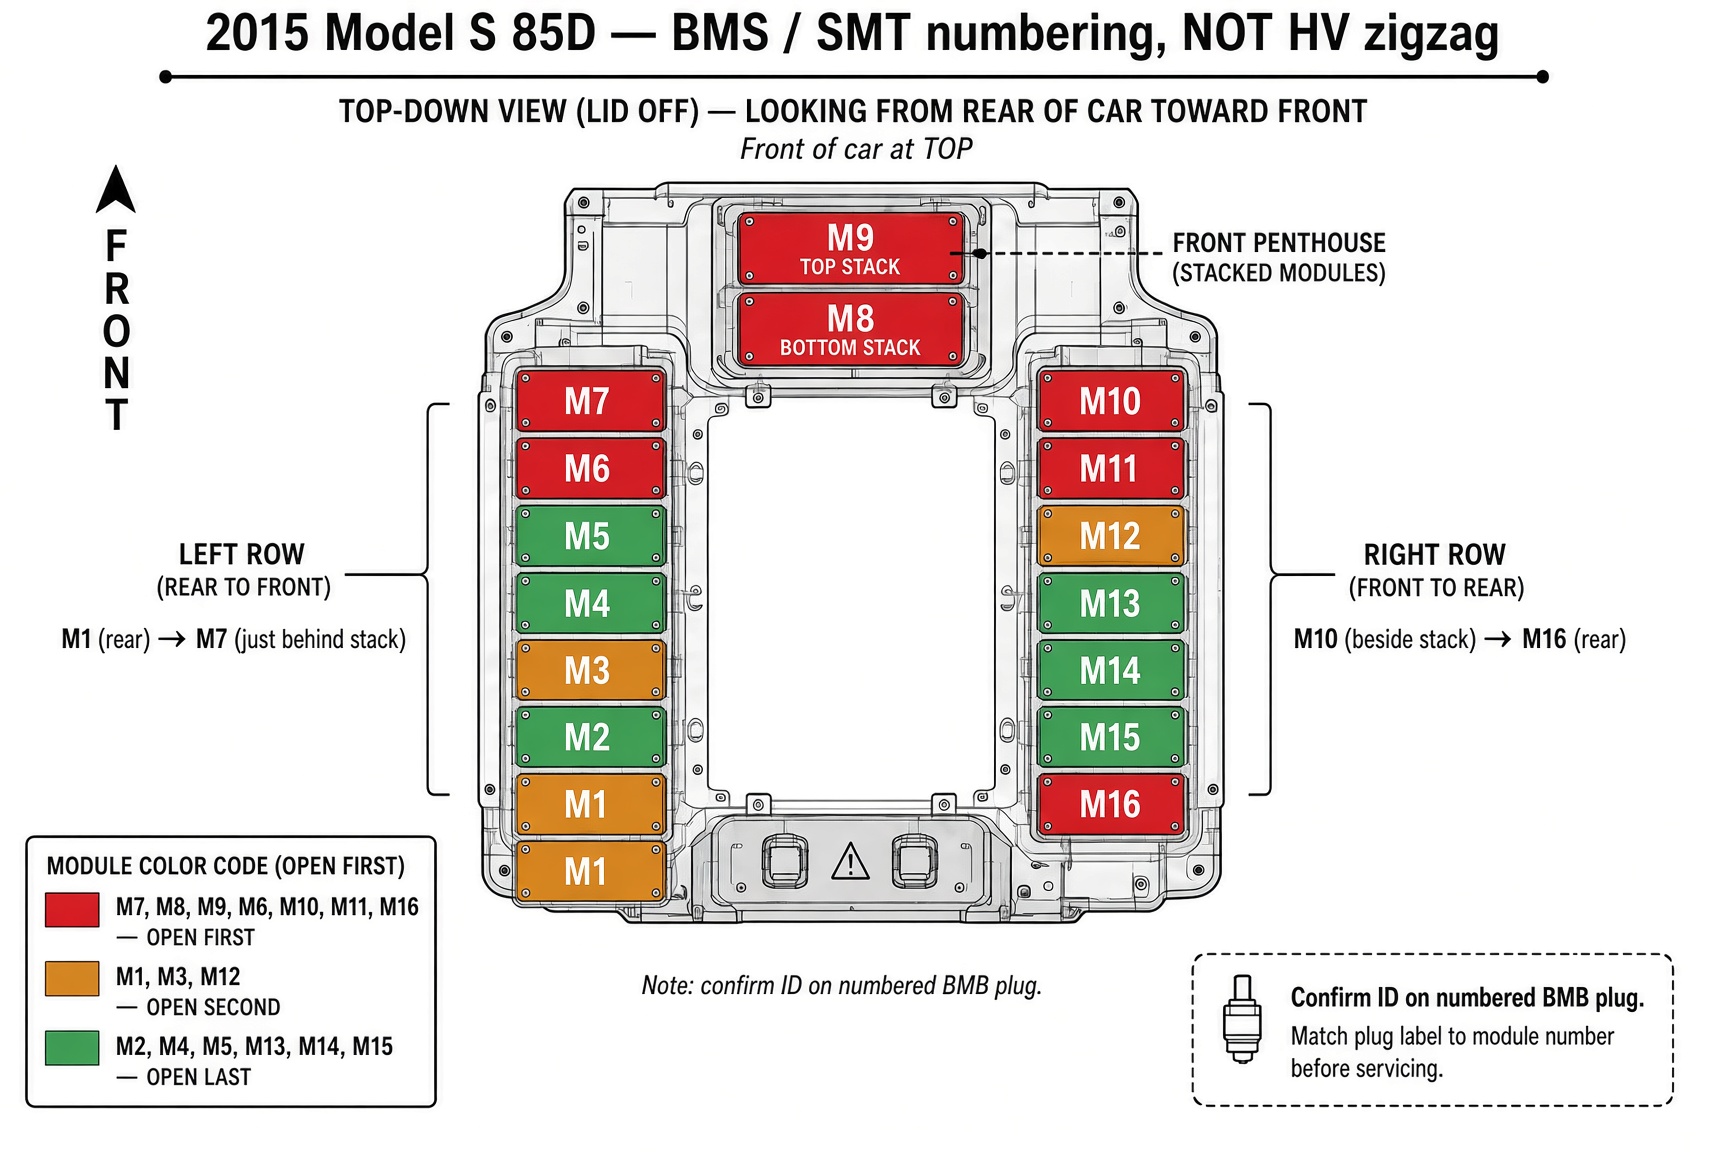
Lid off, front of the car at the top. Stacked pair is M8 bottom + M9 top. Red = open first.
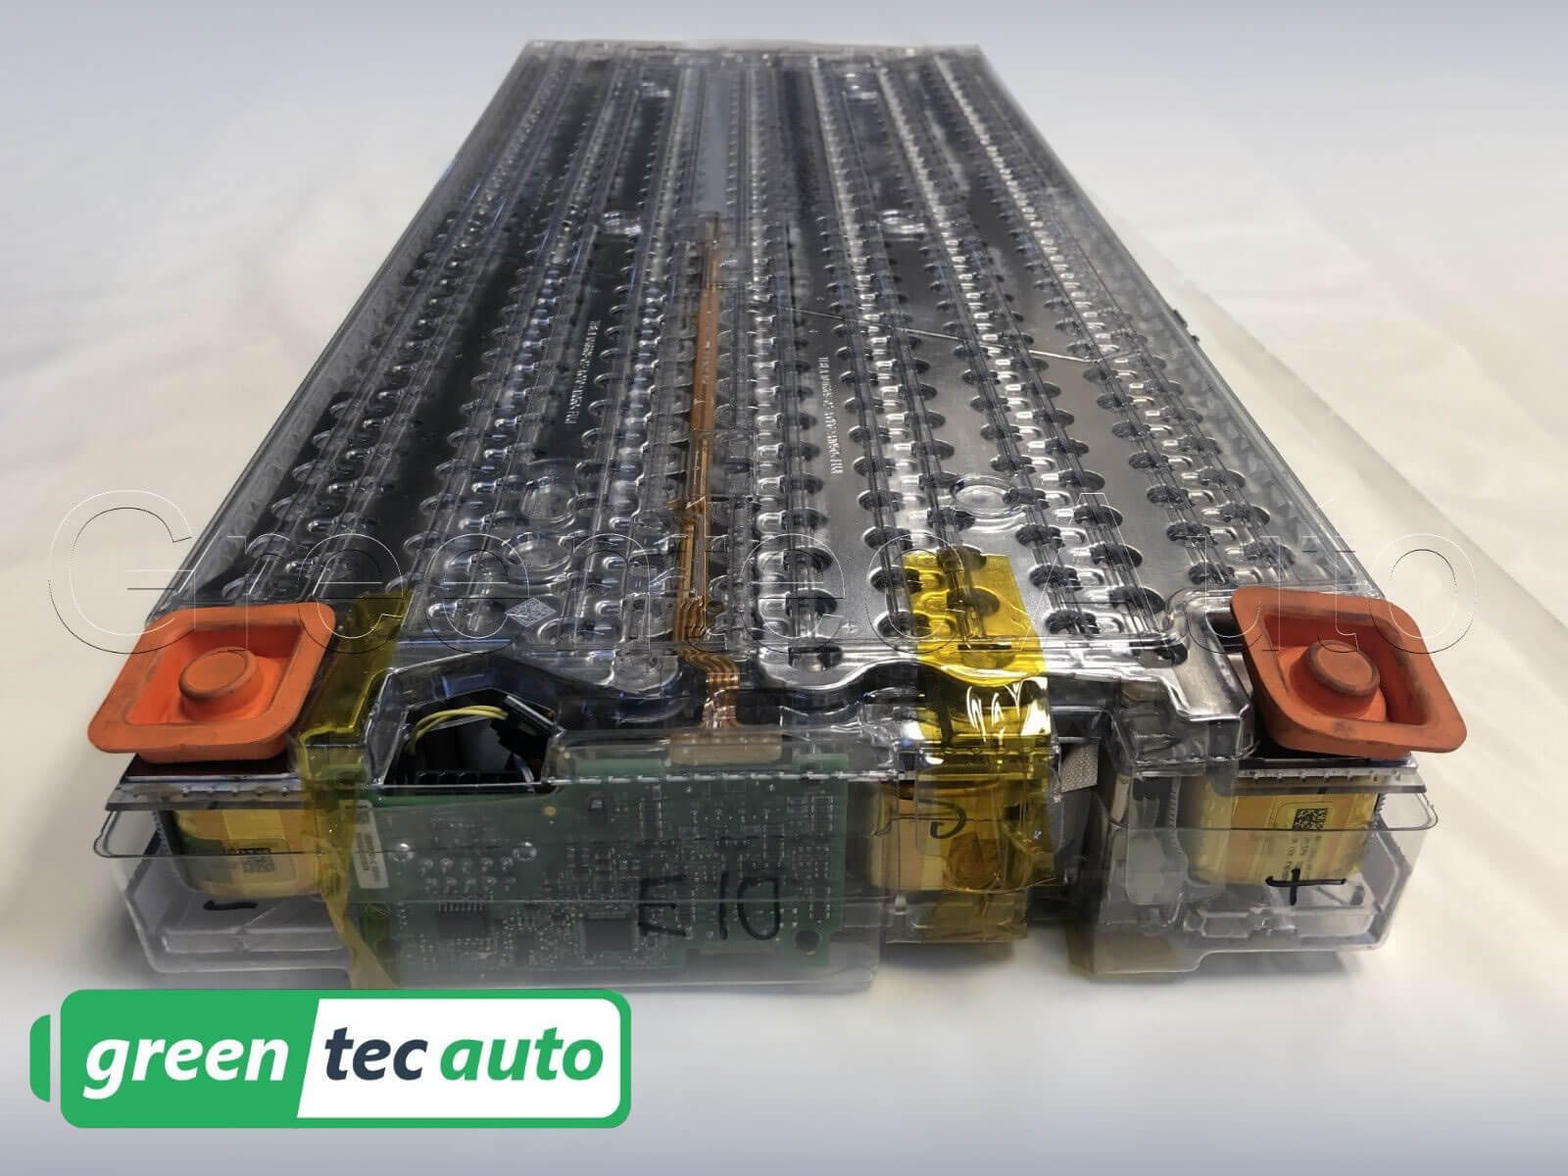
One module: six bricks in a line. The green board at the end is the BMB. SMT draws those six bricks as a 2×3 grid.
This pack’s SMT map
Snapshot 18:32–18:53. Each module is shown the way SMT draws it: top row B1 B2 B3, bottom row B4 B5 B6. B1 is module negative. B6 is module positive.
Open order — keep it simple
- Enclosure first. Valves, fuse cover rust, gasket, white powder. Write down isolation.
- Number the plugs so SMT M8 is physically M8. Do not follow the HV busbar path.
- Stacked pair: M8 (video’s loose-wire example), then M9 (video’s C26/C27 example).
- M7 — pack min and pack max live here. Meter B3 and B6.
- The B5-low / B6-high set: M6, M10, M11, M16. Expect flap + caps, or a green/blue sense lead.
- Mild B3/B4 pairs on M1, M3, M12 — only if the first group is clean.
- Leave M2, M4, M5, M13, M14, M15 last. They are tight. Skip them unless you found water.
Codes the video keeps naming
| Code | Plain meaning | On this pack, think… |
|---|---|---|
| VSSH | Voltage sense harness alert | Loose lead or open sense path. Video’s incoming complaint. |
| F107 / F177 | Bad or open voltage reading | Unseated lead or dead BMB channel. |
| W173 | Brick 6 sense problem | C26/C27 on that module. BMS may invent B6 for a while. |
| U018 | Big state-of-charge gap | Fits a 344 mV spread. Charge often capped. |
| U029 / W117 | Charge limit, sometimes a weak short | Only call this after the meter agrees the low brick is real. |
One-page call at the bench
- B5 and B6 look like opposites on SMT → board or wire until the meter says no.
- Meter agrees with SMT on M7 B3 3.622 and B6 3.965 → real brick.
- Water + rusty fuse cover + low isolation → fix the leak first or the new board fails again.
- Capacity is fine. Do not swap healthy modules “to even it out.” The video is clear that mismatched used modules drift again.